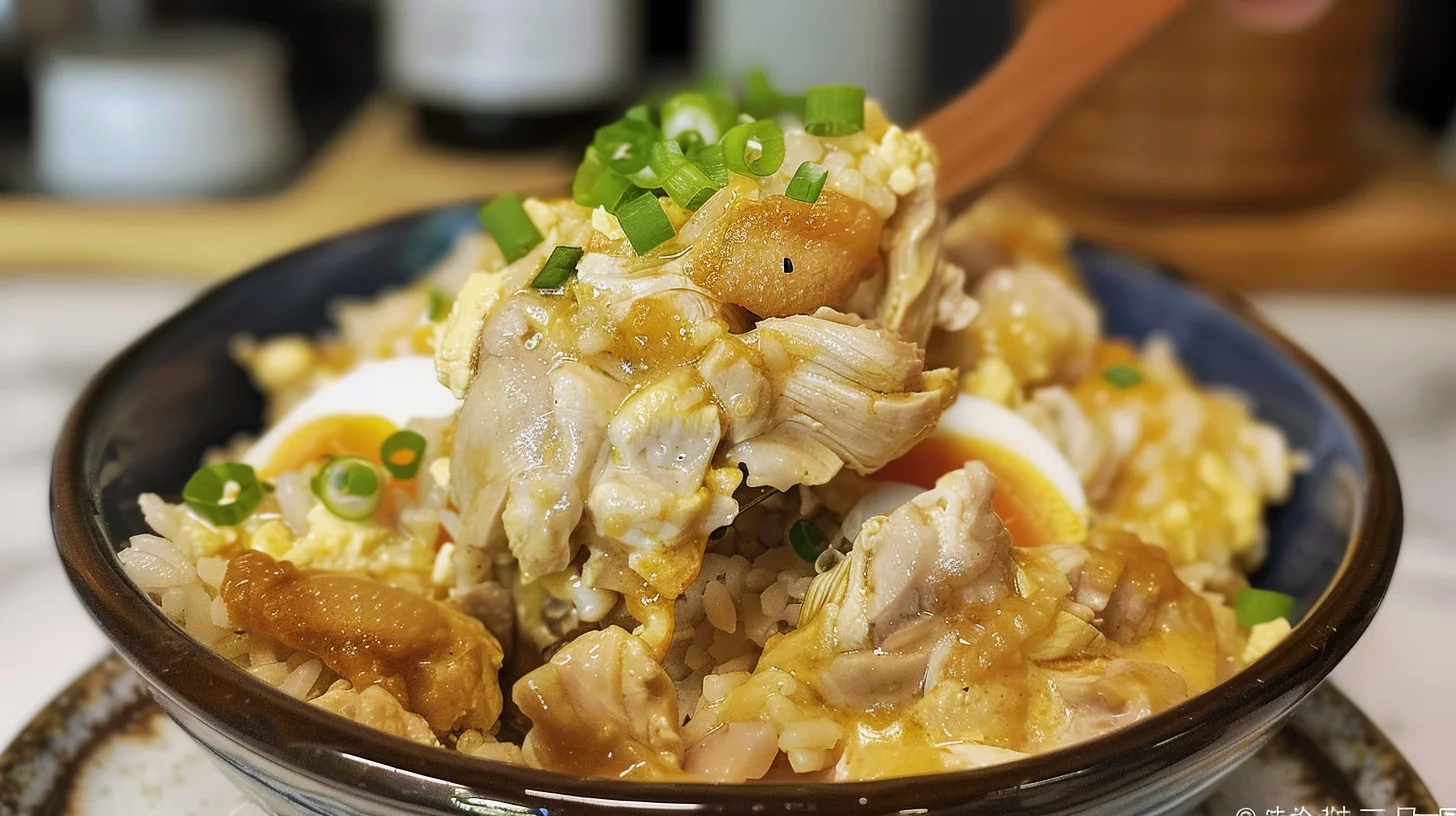
There’s nothing quite like the golden, silky comfort of oyakodon on a chilly evening. This Japanese chicken and egg rice bowl literally translates to “parent and child bowl” – a sweet name for such satisfying comfort food.
My first attempt was a disaster – I scrambled the eggs completely and turned my beautiful dashi into something resembling chicken soup over rice. The onions were burnt, the chicken was tough, and I definitely cried a little.

Now this oyakodon recipe is my go-to when I need something warm and nostalgic. It’s become my perfect weeknight comfort meal that never fails to satisfy.
Ingredients for Easy Oyakodon Recipe
- Japanese short-grain rice: Day-old rice works best because it’s less sticky and holds its shape better when the sauce soaks in.
- Chicken thighs: Much more tender and flavorful than breasts, and they won’t dry out during the quick cooking process.
- Yellow onion: Provides sweet, mellow flavor that balances the savory dashi – slice thin so it cooks quickly and evenly.
- Fresh eggs: The star of the show – use the freshest you can find for the silkiest texture and richest flavor.
- Dashi stock: The soul of Japanese cooking – this umami-rich broth creates the signature flavor that makes oyakodon so special.
- Soy sauce: Japanese soy sauce is less salty and more complex than Chinese varieties, creating better balance in the dish.
- Mirin: This sweet rice wine adds depth and helps create that glossy, restaurant-quality sauce that coats everything perfectly.
- Sugar: Just a touch balances the saltiness and helps create the characteristic sweet-savory flavor profile of authentic oyakodon.
- Sake: Optional but adds another layer of complexity – you can substitute with extra mirin if needed.
- Vegetable oil: Neutral flavor won’t compete with the delicate dashi – avoid olive oil which would be too strong here.
- Green onions: Fresh, bright flavor and beautiful color contrast – slice thin on the diagonal for the most authentic presentation.
- Nori sheets: Adds oceanic umami and traditional presentation – cut into thin julienne strips with kitchen scissors for easiest prep.
- Sesame seeds: Toasted seeds add nutty flavor and textural contrast – toast your own for maximum freshness and aroma.
- Shichimi togarashi: This seven-spice blend adds gentle heat and complexity – sprinkle to taste for authentic Japanese flavor.
How to Make Easy Oyakodon Recipe
- Prepare Rice:
- Warm your cooked rice gently in the microwave or steamer. Divide between four bowls and keep warm while you prepare the chicken and egg topping.
- Make Sauce:
- Whisk together dashi, soy sauce, mirin, sugar, and sake in a small bowl. Taste and adjust sweetness or saltiness to your preference before cooking.
- Cook Chicken:
- Heat oil in a large skillet over medium-high heat. Add chicken pieces and cook 4-5 minutes until golden and cooked through, stirring occasionally.
- Add Onions:
- Add sliced onions to the chicken and cook 2-3 minutes until softened and translucent. They should still have a slight bite for texture.
- Pour Sauce:
- Pour the dashi mixture over chicken and onions. Let it simmer for 1-2 minutes until slightly reduced and coating the ingredients nicely.
- Add Eggs:
- Pour beaten eggs evenly over the chicken mixture. Don’t stir! Let cook 30-60 seconds until eggs are just set but still creamy on top.
- Serve Immediately:
- Spoon the chicken and egg mixture over warm rice. Garnish with green onions, nori strips, sesame seeds, and shichimi togarashi to taste.
There’s something so comforting about watching those golden eggs slowly set over the bubbling chicken and onions. My kitchen always smells like a cozy Japanese restaurant when I make this, and honestly, I usually end up with sauce splattered on my apron and rice stuck to the counter. But when I take that first bite – the silky eggs mixing with tender chicken and that sweet-savory sauce soaking into warm rice – all the mess disappears. This oyakodon has become my ultimate comfort food, the dish I turn to when I need something that feels like a warm hug in a bowl.
How to Store Easy Oyakodon Recipe
Store leftover oyakodon in an airtight container in the refrigerator for up to 2 days. The eggs will continue to set as it cools, but it’s still delicious. You can prepare the chicken and sauce mixture ahead of time and refrigerate for up to 3 days, then add fresh eggs when ready to serve.
To reheat, warm gently in the microwave in 30-second intervals, stirring between each interval. Add a splash of dashi or water if it seems dry. For best results, reheat the chicken mixture separately and serve over fresh warm rice with newly cooked eggs for that authentic silky texture.

What to Serve with Easy Oyakodon Recipe
Oyakodon is traditionally served as a complete meal on its own, but I love to pair it with a simple miso soup and pickled vegetables for a full Japanese experience. Cucumber sunomono or quick-pickled radishes provide a refreshing contrast to the rich, savory bowl. A small side of edamame or gyoza makes it feel like a special dinner.
My personal favorite is to serve it with a cup of hot green tea and maybe some crispy tempura vegetables on the side. The clean, bitter notes of the tea perfectly balance the sweet and savory flavors of the oyakodon, making each bite even more satisfying.

Frequently Asked Questions
- → Can I use chicken breast instead of thighs for oyakodon?
Yes, but thighs stay more tender and flavorful. If using breast, cook gently and don’t overcook to prevent dryness.
- → What can I substitute for dashi if I can’t find it?
Use chicken broth with a pinch of MSG or kombu seaweed, though the flavor won’t be quite as authentic.
- → How runny should the eggs be in authentic oyakodon?
Eggs should be just set on bottom but still creamy on top – they’ll continue cooking from residual heat.
- → Can I make oyakodon ahead of time for meal prep?
Cook chicken and sauce ahead, but add fresh eggs when serving. Reheated eggs won’t have the right silky texture.
- → Why is my oyakodon sauce too salty or too sweet?
Taste your dashi mixture before cooking and adjust soy sauce or sugar. Different brands vary significantly in saltiness levels.

Easy Oyakodon Recipe
- Prep Time: 10 Minutes
- Cook Time: 10 Minutes
- Total Time: 20 Minutes
- Yield: 4 Servings 1x
- Cuisine: Japanese
Description
How to make authentic oyakodon with tender chicken, fluffy eggs, and savory dashi that creates the ultimate Japanese comfort bowl in just 20 minutes.
Ingredients
Base Ingredients
- 4 cups cooked Japanese short-grain rice, day-old preferred
- 1 lb boneless chicken thighs, cut into bite-sized pieces
- 1 large yellow onion, thinly sliced
- 6 large eggs, lightly beaten
Dashi Sauce
- 1 cup dashi stock, homemade or instant
- 3 tbsp soy sauce, preferably Japanese
- 2 tbsp mirin, Japanese sweet rice wine
- 1 tbsp sugar
- 1 tsp sake, optional but recommended
Seasonings & Garnish
- 2 tbsp vegetable oil
- 1/4 tsp salt
- 1/8 tsp white pepper
- 2 green onions, thinly sliced
- 1 sheet nori, cut into thin strips
- 1 tsp sesame seeds, toasted
- Shichimi togarashi, for serving
Instructions
- Prepare Rice: Warm your cooked rice gently in the microwave or steamer. Divide between four bowls and keep warm while you prepare the chicken and egg topping.
- Make Sauce: Whisk together dashi, soy sauce, mirin, sugar, and sake in a small bowl. Taste and adjust sweetness or saltiness to your preference before cooking.
- Cook Chicken: Heat oil in a large skillet over medium-high heat. Add chicken pieces and cook 4-5 minutes until golden and cooked through, stirring occasionally.
- Add Onions: Add sliced onions to the chicken and cook 2-3 minutes until softened and translucent. They should still have a slight bite for texture.
- Pour Sauce: Pour the dashi mixture over chicken and onions. Let it simmer for 1-2 minutes until slightly reduced and coating the ingredients nicely.
- Add Eggs: Pour beaten eggs evenly over the chicken mixture. Don’t stir! Let cook 30-60 seconds until eggs are just set but still creamy on top.
- Serve Immediately: Spoon the chicken and egg mixture over warm rice. Garnish with green onions, nori strips, sesame seeds, and shichimi togarashi to taste.
Notes
- Don’t stir eggs once added to prevent scrambling – let them set naturally for silky texture.
- Store leftovers in refrigerator up to 2 days, but eggs will continue to cook.
- Day-old rice works better than fresh as it’s less sticky and absorbs sauce perfectly.
- Adjust dashi mixture sweetness and saltiness to taste before cooking the chicken.
- Serve immediately while eggs are still slightly runny for most authentic experience.
- Use medium heat throughout to prevent overcooking delicate eggs and tough chicken.
Allergy Information: Eggs, Soy
Nutrition
- Calories: 485 calories
- Fat: 18g
- Carbohydrates: 52g
- Protein: 28g