I still remember the first time I tasted sweet and sour chicken at my neighborhood Chinese restaurant – that perfect balance of crispy coating and tangy sauce had me completely hooked. The golden pieces glistened under the warm restaurant lights, and I knew I had to recreate this magic at home.
My first attempt was honestly a disaster. The chicken turned out soggy, the sauce was way too sweet, and I somehow managed to burn the pineapple chunks. I was ready to give up and stick to ordering takeout forever, but my stubborn side wouldn’t let me quit.

Now this sweet and sour chicken recipe has become my go-to comfort food, especially during those cozy fall evenings when I crave something nostalgic and satisfying that reminds me why homemade always wins.
Ingredients for Best Sweet and Sour Chicken
- Chicken thighs: I always choose thighs over breasts because they stay tender and juicy even if you accidentally overcook them a bit.
- All-purpose flour: Creates the base for our crispy coating, and mixing it with cornstarch gives that perfect restaurant-style crunch you’re craving.
- Cornstarch: This is the secret to getting that golden, extra-crispy exterior that stays crunchy even after tossing in the sauce.
- Eggs: Acts as the binding agent between flour and chicken, helping create those beautiful golden bumps and ridges on each piece.
- Rice vinegar: Provides the perfect tangy bite without being too harsh, and it’s milder than white vinegar so it won’t overpower the sweetness.
- Brown sugar: Adds deep caramel notes and balances the acidity beautifully, plus it helps the sauce get that gorgeous glossy finish.
- Ketchup: Don’t judge me, but this gives the sauce its classic red color and adds subtle tomato sweetness that rounds everything out.
- Soy sauce: Brings that essential umami depth and saltiness that makes this taste authentically Chinese-American rather than just sweet.
- Fresh ginger: A little goes a long way here, adding warm spice and aromatic complexity that dried ginger just can’t match.
- Red bell pepper: Adds beautiful color contrast and sweet crunch that complements the tangy sauce perfectly, plus it looks so pretty.
- Green bell pepper: Provides a slightly more vegetal bite and that classic sweet and sour chicken appearance we all recognize and love.
- Fresh pineapple: Please use fresh if possible because canned pineapple can make the sauce too sweet and the texture gets a bit mushy.
- Green onions: Scattered on top, these add a fresh pop of color and mild onion flavor that brightens up each bite beautifully.
- Vegetable oil: You need enough for deep frying, and vegetable oil has a high smoke point so it won’t burn during the process.
- Cornstarch slurry: This mixture thickens the sauce to that perfect glossy consistency that coats the chicken without being too thick or gloopy.
How to Make Best Sweet and Sour Chicken
- Prep Chicken:
- Pat chicken pieces completely dry with paper towels, then season with salt, pepper, and garlic powder. Wet chicken won’t get crispy, so this step is crucial for success.
- Make Coating:
- Whisk flour and cornstarch in one bowl, beat eggs in another. Dip each chicken piece in egg, then flour mixture, pressing gently to help coating stick.
- Heat Oil:
- Heat oil to 350°F in a heavy pot or deep fryer. Test with a small piece of batter – it should sizzle immediately and float to the surface.
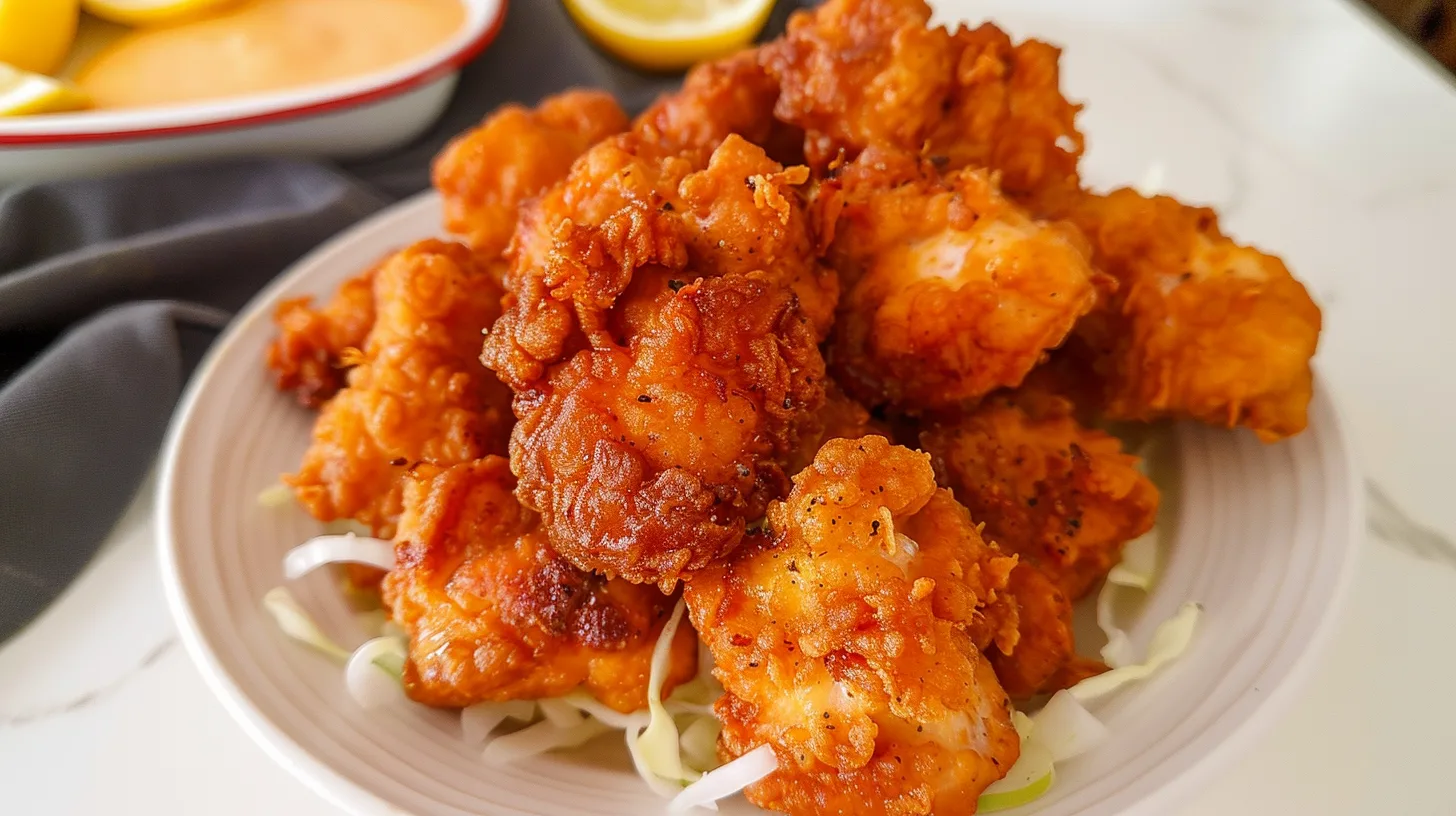
- Fry Chicken:
- Fry chicken in small batches for 4-5 minutes until golden brown and cooked through. Don’t overcrowd the pot or temperature will drop and chicken gets soggy.
- Make Sauce:
- While chicken drains, combine vinegar, brown sugar, ketchup, soy sauce, and ginger in a saucepan. Bring to a simmer, stirring until sugar dissolves completely.
- Thicken Sauce:
- Add cornstarch slurry and bell peppers to simmering sauce. Cook for 2-3 minutes until sauce thickens and peppers are crisp-tender, not mushy.
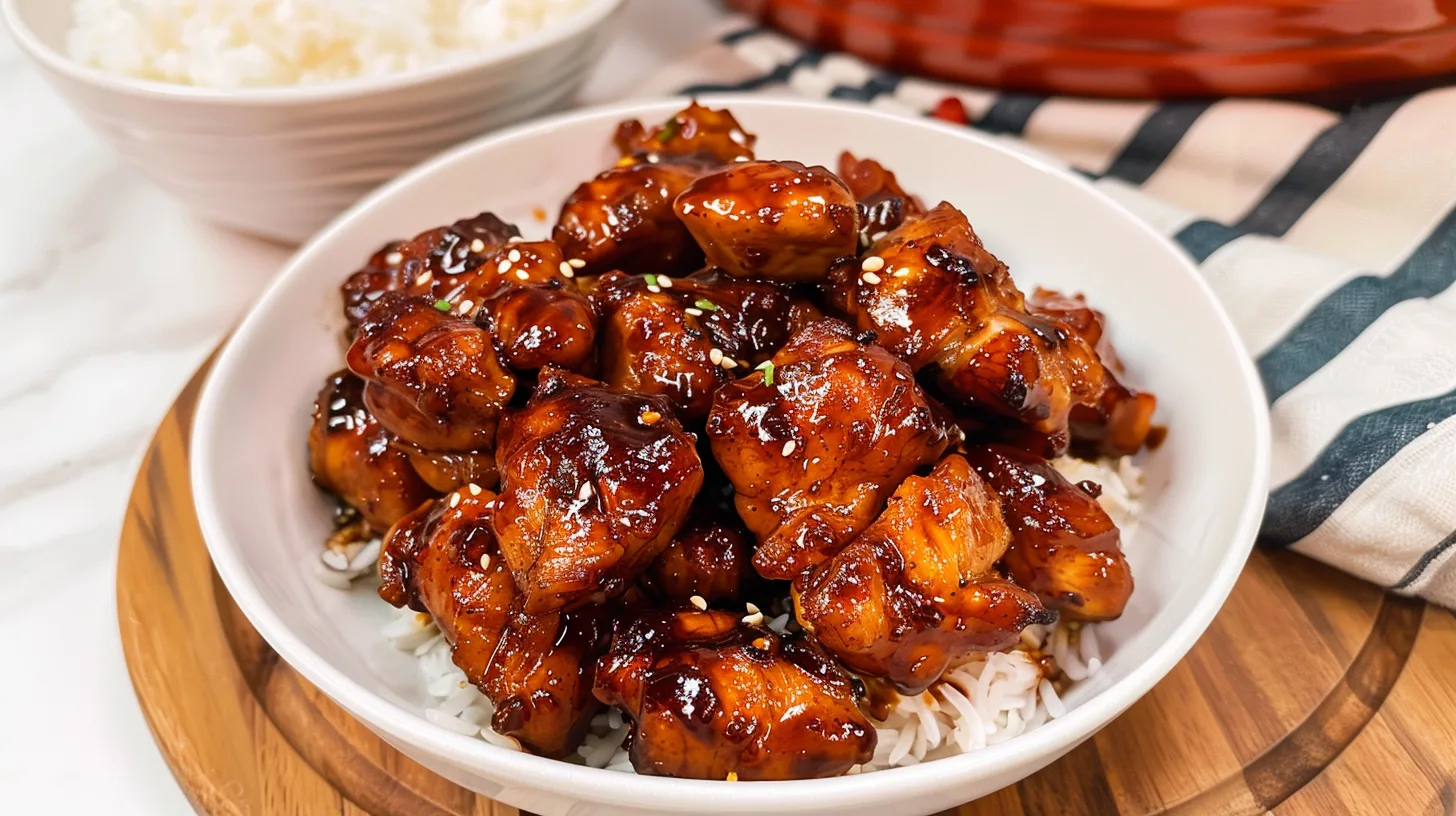
- Combine Everything:
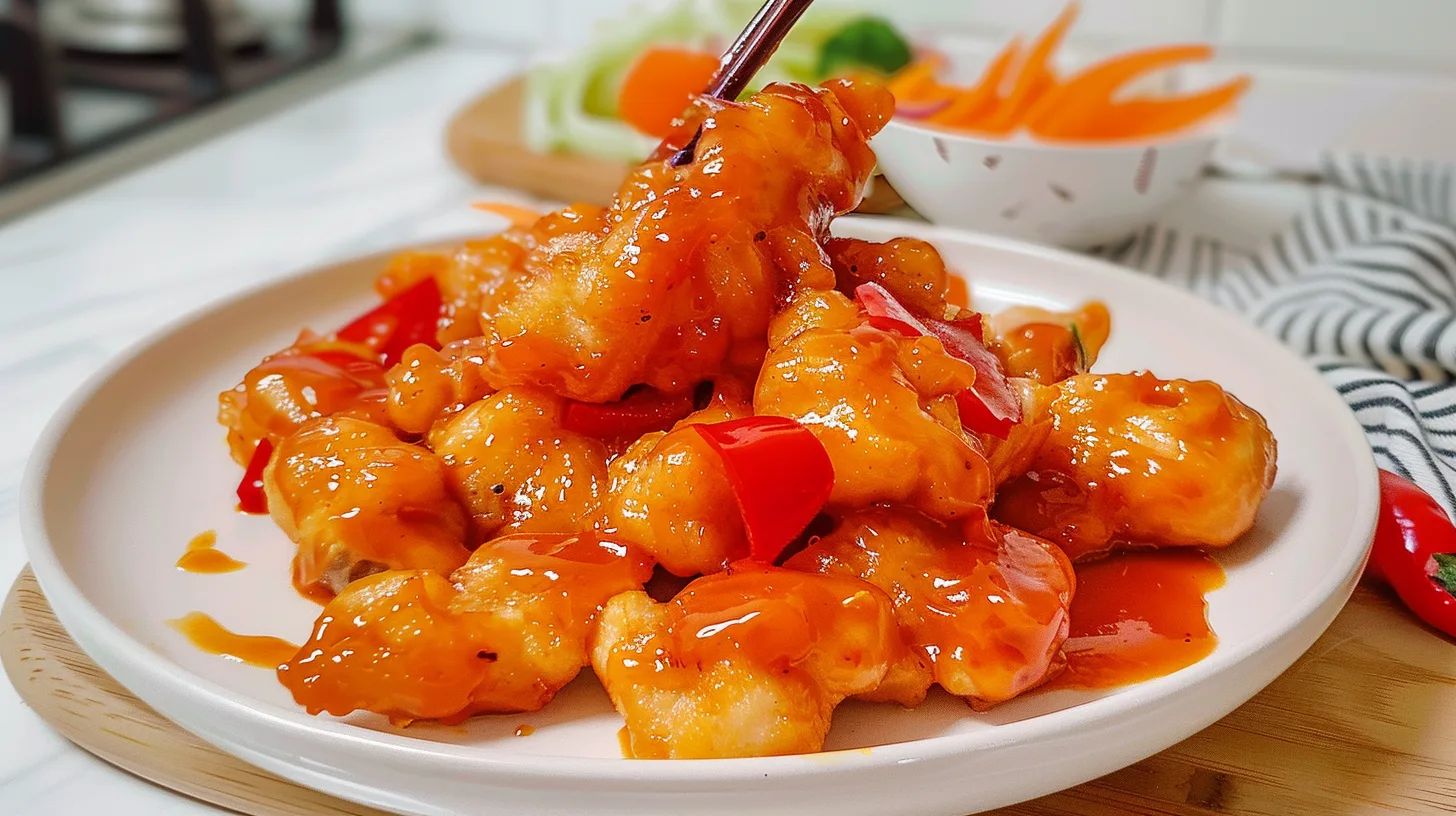
- Toss hot fried chicken with sauce and pineapple chunks. Garnish with green onions and serve immediately while the coating is still crispy and perfect.
There’s something so satisfying about hearing that first sizzle when the chicken hits the hot oil, knowing you’re about to create something way better than takeout. Sure, my kitchen gets a bit messy and I always manage to splatter sauce on my shirt, but when I take that first bite of perfectly crispy sweet and sour chicken, with the tangy sauce coating each golden piece and the pineapple adding that burst of tropical sweetness, I remember exactly why this recipe has become such a treasured part of my cooking routine. It’s comfort food that never fails to make me smile.
How to Store Best Sweet and Sour Chicken
Store leftover sweet and sour chicken in an airtight container in the refrigerator for up to 3 days. I’ll be honest – the coating won’t stay as crispy as when it’s fresh, but it’s still delicious. The sauce can be made ahead and stored separately for up to 5 days, which actually makes weeknight cooking much easier.
To reheat, I recommend using the oven at 350°F for about 10 minutes rather than the microwave, which makes everything soggy. If you want to get fancy, you can re-crisp the chicken in a hot skillet for a few minutes before adding the warmed sauce back in.

What to Serve with Best Sweet and Sour Chicken
This sweet and sour chicken is perfect served over steamed jasmine rice or fried rice to soak up all that gorgeous sauce. I also love pairing it with simple steamed broccoli or snap peas for some extra vegetables and color contrast on the plate.
My personal favorite way to serve this is family-style with a big bowl of rice, some crispy egg rolls, and maybe some hot tea. It turns any regular weeknight into something that feels special and cozy, especially when everyone’s gathered around the table enjoying this homemade comfort food together.

Frequently Asked Questions
- → Can I use chicken breast instead of thighs for sweet and sour chicken?
Yes, but thighs stay more tender and juicy. If using breasts, be extra careful not to overcook them or they’ll get dry.
- → How do I keep the coating crispy after adding the sauce?
Only toss with sauce right before serving, and serve immediately. The coating will soften the longer it sits in sauce.
- → Can I make sweet and sour chicken without deep frying?
You can bake coated chicken at 425°F for 20 minutes, but it won’t be as crispy as the fried version.
- → What can I substitute for rice vinegar in the sauce?
White vinegar works but use less since it’s stronger, or try apple cider vinegar for a slightly sweeter flavor profile.
- → How long does homemade sweet and sour sauce last in the refrigerator?
The sauce keeps for up to 5 days in an airtight container and actually tastes better after the flavors meld overnight.

Best Sweet and Sour Chicken
- Prep Time: 20 Minutes
- Cook Time: 15 Minutes
- Total Time: 35 Minutes
- Yield: 4 Servings 1x
- Cuisine: Chinese-american
Description
How to make crispy sweet and sour chicken with tender bites and tangy pineapple sauce that tastes better than your favorite Chinese restaurant.
Ingredients
Chicken and Coating
- 2 lbs boneless skinless chicken thighs, cut into 1-inch pieces
- 1 cup all-purpose flour
- 1/2 cup cornstarch
- 2 large eggs, beaten
- 1 tsp salt
- 1/2 tsp black pepper
- 1/2 tsp garlic powder
Sweet and Sour Sauce
- 1/2 cup rice vinegar
- 1/2 cup brown sugar
- 1/4 cup ketchup
- 2 tbsp soy sauce
- 1 tbsp cornstarch mixed with 2 tbsp water
- 1 tsp fresh ginger, minced
Vegetables and Garnish
- 1 red bell pepper, cut into chunks
- 1 green bell pepper, cut into chunks
- 1 cup fresh pineapple chunks
- 3 green onions, sliced
- 2 cups vegetable oil for frying
Instructions
- Prep Chicken: Pat chicken pieces completely dry with paper towels, then season with salt, pepper, and garlic powder. Wet chicken won’t get crispy, so this step is crucial for success.
- Make Coating: Whisk flour and cornstarch in one bowl, beat eggs in another. Dip each chicken piece in egg, then flour mixture, pressing gently to help coating stick.
- Heat Oil: Heat oil to 350°F in a heavy pot or deep fryer. Test with a small piece of batter – it should sizzle immediately and float to the surface.
- Fry Chicken: Fry chicken in small batches for 4-5 minutes until golden brown and cooked through. Don’t overcrowd the pot or temperature will drop and chicken gets soggy.
- Make Sauce: While chicken drains, combine vinegar, brown sugar, ketchup, soy sauce, and ginger in a saucepan. Bring to a simmer, stirring until sugar dissolves completely.
- Thicken Sauce: Add cornstarch slurry and bell peppers to simmering sauce. Cook for 2-3 minutes until sauce thickens and peppers are crisp-tender, not mushy.
- Combine Everything: Toss hot fried chicken with sauce and pineapple chunks. Garnish with green onions and serve immediately while the coating is still crispy and perfect.
Notes
- Oil temperature is critical – use a thermometer for best results and crispiest coating.
- Store sauce separately from fried chicken to maintain crispiness for leftovers.
- Fresh pineapple works better than canned for the right texture and sweetness balance.
- Don’t skip drying the chicken thoroughly or the coating won’t stick properly.
- Serve immediately after combining with sauce for maximum crispy texture.
- Sauce can be made up to 5 days ahead and reheated when needed.
Allergy Information: Eggs, Gluten, Soy
Nutrition
- Calories: 485 calories
- Fat: 22g
- Carbohydrates: 38g
- Protein: 32g